Today we’re talking about how to propagate a peace lily. They’re a houseplant classic for a reason, and they’re actually incredibly easy to transform into multiple plants. So you’ll have plenty to enjoy yourself or share!
Propagating peace lilies can be done in three steps:
- Identify the new plant growth (known as crowns)
- Separate the crowns from the main plant using a knife, scissors or your hands
- Pot the crowns as independent plants in soil or water
In this post, I’m using my own lovely peace lily to walk you through the entire process as I identify crowns and divide them into three separate plants. I’ll also demonstrate how to pot your new peace lilies in soil and water.
So come along with me as we delve into peace lily propagation!
RELATED: Peace lily flowers are usually white, but they can turn other colors as well. Find out what’s behind brown flowers on a peace lily and what to do next!
Table of Contents
How Do You Multiply Peace Lilies?
In their native habitat in Venezuelan and Columbian rainforests, young peace lilies grow along the surface of the ground outwards from a central plant. The mother plant sends out new growth points called rhizomes, which are basically chunky roots or tubers.
Peace lilies do not produce node tissue on their stems the way many other plants do. So you cannot grow more peace lilies from a stem cutting- it won’t form any roots and will wither in a few days.
There are two methods for propagating a peace lily:
- Division
- Seed (but this is tricky and takes a long time, so most people stick with division)
People sometimes refer to the new plant growth as peace lily pups, but the proper term is a crown. Each crown will eventually develop its own root system capable of supporting it as an independent plant. In division propagation, we’re separating these crowns into individual plants, thereby multiplying our peace lily population.
Preparing for Peace Lily Propagation
First things first- you’ll need an area where you can make a bit of a mess.
If the weather is mild weather, feel free to move this process to a shady area outdoors. Otherwise, if you’ll be doing your propagation inside (like I did), lay down an old bedsheet or large piece of paper. Overlapping newspapers work well, but I always use a brown paper bag that I’ve opened the bottom seam and ripped up one corner fold to make a large sheet.
After you’ve got your work surface prepared, gather your supplies:
- Your peace lily plant
- Soil
- Pots or jars for your new baby plants
- Watering source (if planting new crowns in water)
- Sanitized scissors or knife

One thing that’s missing from this photo is a serrated knife. I honestly expected to be able to separate this plant’s crowns with my bare hands or scissors, but I ended up needing to grab a serrated knife to get the job done.
Whether you end up using a knife or scissors, make sure to wipe down the blades with alcohol to kill off any microbes that could cause disease.
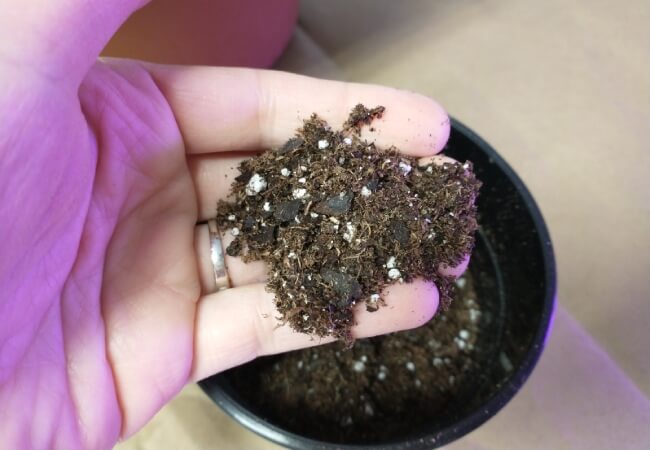
The soil I’m using here is peat-based for a light, fluffy texture that drains well:

Peace lilies prefer their soil to stay on the moist side, but they do not tolerate heavy, waterlogged soil. Standard coir-based or peat-based houseplant soil should be just fine for your peace lily, but you can always mix in some perlite or orchid bark to lighten the soil a bit more.
One of the growing methods I’ll be showing you is settling your plant in water. I’m using a small Mason jar and expanded clay pebbles for this:

How to Propagate a Peace Lily
The actual propagation process comes down to:
- Identifying crowns for propagating
- Separating crowns from the mother plant
- Potting the crowns
Continue reading below to learn how to divide a peace lily step-by-step. But if you’re more of a visual learner, this video from This Is A Plant does a great job of demonstrating the process:
Step 1. Identify Peace Lily Crowns
Your first actual step for dividing a peace lily is deciding which parts you want to separate out.
Here’s my mother plant:

If you wanted to end up with two larger peace lily plants, you could just divide your peace lily straight down the middle of the root ball. But if you want more plants, you can separate individual crowns. That’s what I’m doing here.
Here are a couple of photos of peace lily pups (crowns) I could propagate:


You can see how each crown looks like a mini-plant.
To live apart from the mother plant, each crown you want to propagate must have at least a few leaves and a root system. So in other words, don’t separate just one or two stems and a single root- your crown needs more support than that to live.
Instead, take a chunk with several stems- chances are good that a crown that big will have plenty of roots of its own.
Step 2: Dividing Peace Lily Crowns
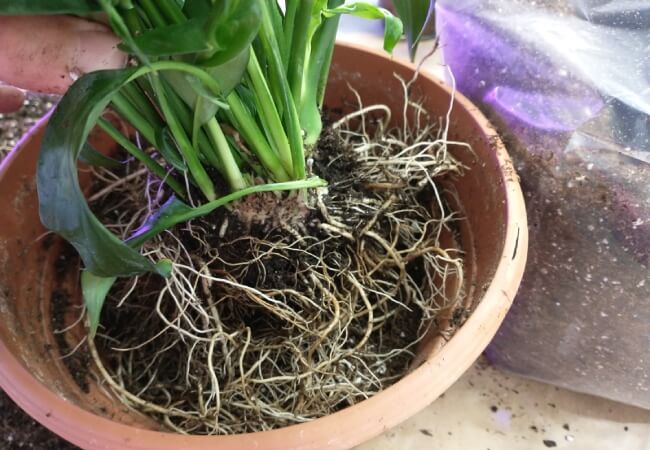
Now that you’ve got some targets selected, unpot your peace lily and brush away as much soil as you can. This lets you get a good look at the root system and crown bases:

Detangle the roots gently as you go, loosening any compacted areas and working longer roots free. You’ll probably snap off quite a few smaller roots in this process- I did! It’s ok if your plant loses some of the finer root tips since they’ll grow back pretty quickly.
But do try not to snap any larger roots- they’re the true lifeline of the plant, and they’re harder to replace.
I spent about 10 minutes gently working the root system as free as I could. Besides protecting roots from breaking, this can also help you get a better idea of how many roots your target crown has.
Here’s a better look at one of the crowns I’m going for once I brushed some soil out of the way:

Try to separate the crown by hand first- on smaller plants you should be able to. But on this larger plant, I needed a knife to slice through the thick rhizome:

Carefully slice downward to sever the rhizome. Don’t be afraid to use a little force if you have to- plants are tougher than we give them credit for!
Once you’ve cut through the rhizome, gently pull the crown outward to get the roots free from the mother plant. They’ll likely be tangled with the larger root ball, but just go slowly and gently, and they will come loose:


Congratulations- you’ve got a baby peace lily to plant in soil or water!
Repeat this process for as many crowns as you want to propagate. I cut off one more crown from my mother plant.
Step 3: Potting Peace Lily Crowns as Independent Plants
Let’s move on to potting up these new baby plants! We’ll cover potting in soil first, then in water.
Potting Peace Lily Crowns in Soil
This is the original pot my peace lily was in, and I’m going to reuse it to replant what’s left of my mother plant. Add some of your fresh soil to the pot, about 2-3 inches, depending on your pot size:

Then set your plant’s root ball on top and add more soil around the edges and top to fill in:

Gently tamp down the soil to dislodge air pockets and help the particles settle around your plant:

Here’s one of the new crowns potted up in exactly the same way:

I always wait to water for a couple of days after propagation or repotting- this gives the cut areas a chance to heal over before being exposed to moisture. After that time, give your plant a good watering, and add extra soil if you notice compacted areas.
After your plant has had a chance to recover for a few weeks after propagation, you might want to consider giving it a boost with a homemade peace lily coffee fertilizer.
Potting Peace Lily Crowns in Water
You don’t want to introduce soil into the water, so rinse your crown’s roots out as well as you can:

Your goal is to have only the root system submerged, and your baby plant needs some support in its new water home. I’m using expanded clay pebbles, but you could also use glass beads or small river rocks.
Add a couple of inches of pebbles to the jar, then set your crown in and see if you need more or fewer pebbles to bring the roots about an inch below the jar’s lip:

Now add more pebbles on top of the roots and around your crown to hold it steady in the jar:

I had to experiment a few times to get the pebbles arranged just right to hold the crown nicely upright.
Now add water. You don’t want the stems underwater, so bring the waterline just over the roots:

All done!

Here’s a look at how one plant became three- in just about 40 minutes!

Caring for Your Peace Lily Plants After Propagation
The nice thing about root division propagation is that each new plant already has a root system in place. Thanks to this, these new plants are less delicate than ones from stem or leaf propagation.
They can be treated much like mature plants, but there are still a couple of points to keep in mind to help your peace lilies thrive after propagating:
For peace lily propagations in soil: Wait to water for a couple of days since we made cuts to the root system. This lets the cut area have a chance to form a protective callous that helps keep infection at bay.
Also, hold off on giving any fertilizer for a few weeks after propagation. This allows your plants to recover from the stress of being handled before they have to deal with processing an influx of nutrients.
After this, water when the top inch of soil feels dry, and fertilize monthly with a diluted houseplant fertilizer during the active growing season (typically April-October).
For peace lily propagations in water: You’ll need to add a few drops of fertilizer every few weeks, but let your new plant have a couple of weeks to recover from propagation first.
Add water as needed to keep the water line above the roots, and change the water out completely every 2-3 weeks.
RELATED: Philodendrons are another popular type of houseplant- and they’re easy to propagate too. Find out the different methods for propagating philodendron!
Frequently Asked Questions about How to Propagate Peace Lily
Final Thoughts
I hope you’ve got a lot better understanding on how to propagate peace lilies. Propagating a plant you already have at home into multiple new plants is a satisfying experience.
There’s really no better way to grow your own collection or have plants to give away, and peace lilies make the propagation process beyond easy.
I hope you’ve found this guide helpful! If you have any other questions or tips you’ve picked up along the way, I’d love to hear them in the comments. There’s truly no better way to learn that from each other!

