
Once you have one philodendron, you start to want more. Fortunately, instead of spending your hard-earned money at your local houseplant depot, you can generate your own through the process of propagation!
There are four common methods for how to propagate philodendron of all types:
- Stem cuttings
- Offshoot and root division
- Node propagation
- Air layering
Since there are more than 450 philodendron varieties out there, that means lots of diversity in growth and reproduction habits. Here’s a quick breakdown of which method works best for different philodendron varieties:

In this article, you’ll learn the process of propagating more philodendron plants using each of these four methods, and we’ll also answer some common questions you might be wondering about.
Let’s jump in and make some new plants!
Table of Contents
Supplies for Philodendron Propagation
There are a few supplies that you’ll need for getting your philodendron starts regardless of which method you use, namely:
- Sharp scissors or pruning shears
- Alcohol for sanitizing
Sharp Scissors or Pruning Shears
You want to make clean cuts in your plant- jagged edges look messy and can pave the way for microbes to infect plant tissue. While you can use any pair of scissors you have around the house, you’ll have the best results if you invest in a high-quality product that’s designed for working with plants.
Alcohol for Sanitizing
You want to keep all your tools clean to prevent the transfer of harmful microbes. Always wipe down your scissor/pruning shear blades with alcohol before and after propagation.
You can use either your standard bottled rubbing alcohol or wipes. The choice is up to you!
Method 1: How To Propagate Philodendron From Stem Cuttings
This method works by cutting off a section of the philodendron stem and placing it in water or potting soil until it grows some roots, after which you can pot it up.
How to Take a Good Philodendron Stem Cutting
Vining or trailing types of philodendrons grow roots easily, and you can take a cutting from almost anywhere on the vine that a leaf joins the stem.
A few examples of trailing/vining philodendron include:
- Heartleaf philodendron
- Philodendron Micans
- Philodendron Brasil
- Philodendron Lemon Lime
In upright philodendrons, target stems that have at least two leaf junctions and ideally some aerial roots, too.
Upright philodendrons that you can propagate through stem cuttings include:
- Philodendron Pink Princess
- Philodendron Burle Marx
- Philodendron Hope
- Philodendron Xanadu
- Philodendron Green Congo
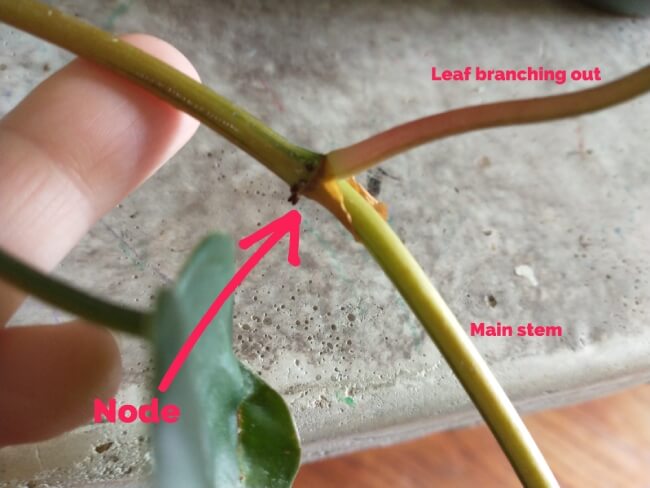
This photo shows what a node looks like on my Philodendron Brasil, a trailing variety:
Look for strong stems that are 4-6 inches long and with at least two leaf nodes. Here’s a good candidate:

Cut the stem just below a node. Your cut will be on the side closest to the plant- you want the entire node to be on your cutting.
Then remove the leaves directly above. This exposes the node tissue for new root development, and it also prevents leaf tissue from decomposing in the water you’ll be using the next step.
Here’s a prepared cutting:

How to Root Philodendron Cuttings in Water
Rooting philodendron cuttings in water is the most common strategy, since it yields results pretty quickly and makes it easy to monitor your cutting’s progress.
Materials needed:
- Sharp scissors or pruning shears
- Alcohol
- Glass jar (less than six inches tall is best)
Place the philodendron clipping in the jar, and pour enough water in to cover the bottom of the cutting plus a couple of inches of stem. This will encourage the node near your cut to grow roots, but the rest of the stem won’t rot from sitting in too much water.

Place the jar in a spot that’s warm and bright but not hot and super-sunny. Check the water level regularly and add more as needed to maintain the depth. Replace the water if you see any cloudiness.
A few tips for choosing the right jar: Small-mouth jars lose less water to evaporation. Amber or other dark glass grows less algae or bacteria–you can use a paper bag to cover the outside of the jar to get the same effect. (I personally have not run into any problems with clear glass and algae growth, however.)
Within a week or two, you should see small rootlets developing from the node. Typically, you see root growth from the lower node submerged in the water. But you can also have new roots forming from a higher node- that’s what happened to my stem cutting here:

I’ve also got some new leaf growth going on as well:

Let the roots grow until they are about an inch long, and then you can pot up your new philodendron plant. Or if you’d prefer, you could leave your cutting in water permanently. Vining philodendrons are versatile like that!
You can also root a cutting in soil with just a bit more work, so let’s cover that next.
How to Root Philodendron Cuttings in Soil
Rooting your stem cuttings in soil gives you the benefit of already having your new plant potted, letting you skip the step of re-potting later on. But be aware- rooting in water is typically faster and has the highest success rate.
However, some people have great success with rooting in soil and prefer it. I recommend trying it both ways yourself to see which one you like better!
Materials needed:
- Scissors or shears
- Alcohol
- Rooting hormone (optional)
- Potting soil
- Small pot with drainage holes
Here’s the method for rooting philodendron cuttings in soil:
- Prepare a small pot with philodendron-friendly potting soil– something light and well-draining.
- Take a cutting following the same procedure as above. It isn’t necessary, but if you want, you can get rooting hormone powder and dip the cut end into the powder.
- Use a pencil to poke a hole in the top of the soil, and insert your cutting here. If necessary, support the rest of the stem or vine with a small stick or even a chopstick. For this method to work, the cutting needs to stay undisturbed so it can form roots.
- The key to this method is keeping the soil moist, but not wet. You can lightly water or even use a spray bottle to thoroughly mist the soil each day, or more often if necessary.
- Again, keep the cutting in a warm, bright place. Soil-rooted cuttings seem to take a bit longer to develop roots– about three weeks, give or take.
- To test for new root growth, gently pull upwards on your cutting. If you feel resistance, congratulations- you’ve got new roots! If the cutting still moves freely, check back again in a week or so.
Method 2. How to Propagate Philodendron from Offshoots and Root Division
Typically, mature upright philodendrons create offshoots, or brand-new baby plants also known as pups. These look like miniature versions of the mother plant, and emerge from the soil around the base of the primary plant.
In addition to offshoots, there are also stem nodes that you could propagate. But separating baby plants tends to be the easier and better choice when it’s available to you.
A couple of examples of philos that produce offshoots include:
- Philodendron Birkin
- Philodendron Hope
- Philodendron Xanadu
- Philodendron Rojo Congo
And you can divide the root system of any large, established philodendron to create two separate, smaller plants.
Offshoot Division
With this method, you’ll be separating baby plants from their mother to make individual new plants.
Materials needed:
- Serrated knife or sharp scissors
- Alcohol
- Potting soil
- Small pots with good drainage
This photo shows my Philodendron Birkin mother plant with two offshoots, each with its own developing root system. I’ve marked the offshoots with arrows to make it a little easier to see:

Here’s another look at the mother plant and offshoot from a different angle. You can see the separate main stems a little better:

The nice thing about offshoot division is that these pups already have a root system of their own, so all you need to do is separate it/them from the mother and give it its own pot.
That’s exactly what I did with both offshoots on my Birkin. First, remove the entire root ball from the pot and gently tease away the offshoot from the side.
You’ll likely encounter a connecting root between the pups and the mother plant. That’s what you see in this photo:

Cut that root with sanitized scissors/pruning shears to fully disengage the offshoots.
Here they are separated from the mother plant. See how they come with an already-established root system:


Once you’ve got your offshoots separated, pot them up in their own containers and care for them just like the mother plant:

Another way to separate offshoots is to take a serrated knife and cut into the soil around the pup in a 2-3 inch perimeter. Try to angle the knife tip slightly inward, like you’re cutting out a cone. Then, use the knife to lever the pup and its root clump out of the soil. Finally, plant the pup in its own pot.
Root Division
You can divide most philodendrons by the root, but it works best with older, established plants that have a healthy and expansive root system.
Materials needed:
- Serrated knife
- Alcohol
- Potting soil
- Small pots with good drainage
This process is fairly simple:
- Tilt the philodendron in its pot onto its side and gently remove the root ball from the pot.
- Brush away enough soil so you can get a good look at the roots and how they attach to the foliage.
- Use the knife to gently cut off sections of root that have their own clump of foliage attached.
- Pot up each of these sections in their own pot, and add enough soil back into the mother plant’s pot to keep the soil level about an inch below the lip of the pot.
- Don’t water any of these plants for at least a couple days to give the cuts time to scab over before they touch moisture.
Method 3: How to Propagate Philodendron Through Node Propagation
No leaves? No problem. You can still propagate a philodendron from a node!
Materials needed:
- Scissors or shears
- Alcohol
- Rooting hormone (optional)
- Potting soil
- Small, shallow dish
- Plastic zip-top bag large enough to hold the dish
Identifying a Philodendron Leaf Node
So what is a node, anyway?
A node is the botanical term for the small brown bumps that occur on certain types of plants–especially tropical plants with a vining habit, like many philodendrons. These nodes form at the “joints” of the vine, and they easily develop into stems when there is enough moisture.
In their natural habitat, these nodes grow aerial roots that anchor the philodendron to trees, rocks, and other natural supports. But you can use nodes to propagate several philodendron cuttings from a single vine.
I’ll explain the steps here, but if you’d like to see the process in action, this video from Techplant (a favorite Youtube channel of mine!) does a great job of outlining the entire node cutting and rooting steps:
How to Take a Node Cutting
Here, you are essentially taking a cutting from a vine, but you are targeting nodes instead of stems with leaves or stems of a certain length.
Look carefully at your plant’s main stem- you’re looking for bumps or the starts of aerial roots. These are the nodes, and each separate node means a chance to grow a new plant.
So for example, if you’ve got 5 nodes on one stem, you could grow 5 separate plants if each propagation is successful. This method gets you many small philodendrons quickly, as opposed to one larger philodendron.
To get your node cuttings, use sharp scissors or pruning shears to cut about 1/2 to 1 inch below the lowest node you want to use. Then cut in between each individual node to get multiple stem chunks.
Let these node sections sit out in the room air for a bare minimum of 30 minutes, up to a few days. This allows the stem to form a protective callous that helps keep mold or bacterial infection at bay.
How to Root a Node Section
To force a node to make roots, fill a shallow dish with potting soil, and spray it with water just enough to dampen the surface. If you’d like, you can dip the node in rooting hormone to help stimulate growth, then lay the node sections on the soil.
Place the entire dish into a plastic zip-top bag to create a humid micro-climate. Open the bag about once a week to let excess moisture escape.
Within a few weeks, the brown bump on each node should turn into one or more roots. Allow the roots to get at least a couple of inches long, then pot it up. Keep the soil moist for the first few days.
Method 4: How to Propagate Philodendron with Air Layering
Air layering is an easy way to create new philodendrons with developed root systems without even cutting them away from the mother plant first. It works best on trailing philos and the upright types with lots of nodes– again, you’re basically forcing aerial roots to form out of these nodes.
Here are a few examples:
- Philodendron Micans
- Heartleaf Philodendron
- Philodendron Green Congo
- Philodendron Bob Cree
Also- air layering is a great option if you’ve got an expensive, rare variety that you don’t want to cut until you know that you’ve got new roots to work with.
Materials needed:
- Scissors or shears
- Alcohol
- Moss or coconut coir
- Twine or twist ties
- Plastic bag or plastic wrap (reuse this whenever you can!)
Identify an Appropriate Node
Here’s my delightful Philodendron Micans, another trailing variety (and probably my favorite plant in my collection!):

This plant normally lives in a hanging basket. But since I’ll be adding extra weight to the stem through the air layering process, I took it down and let it rest on a surface.
RELATED: If you’d like one of these beautiful plants yourself, I don’t blame you! I show you exactly how I care for my Philodendron Micans on a different post, so check it out if you’re interested.
Find a node on a vine that you wouldn’t mind cutting off. I have a leafless node on this stem, so it’s going to be my target for air layering:

Wrap Node in Damp Moss and Plastic
Take the moss or coconut coir, dip it in water until it is saturated and wrap it around the node.


Then wrap the plastic around the moss and secure it with twine or twist ties:


Now comes the waiting part. Keep the moss damp by partially unwrapping the node and spritzing the moss with a spray bottle. New roots may form in several days or as long as a few weeks.
Eventually, you should see new root growth from the node into the moss. Once the new roots are at least 1-2 inches long, use sanitized shears to cut the stem below the wrapped node.
Unwrap the plastic and pot up your new philodendron baby. Keep the soil moist for several days until the roots adjust to being in soil instead of moss.
Frequently Asked Questions about Propagating Philodendron
Final Thoughts
Philodendrons are genuinely not hard to propagate, and hopefully this article has made it even easier! It’s just another reason to love these big-leafed, low-maintenance houseplants.
Have you ever propagated a philodendron? What method did you use, and how did it go for you? We learn best as a community, so let us know your thoughts and experiences in the comments!