Hydroponics is the future of growing food, but it’s hard to know where to start.
You can’t buy a hydroponic system at your local garden store, and you don’t want to spend $200 (or more!) on an off-the-shelf solution online. The DIY approach sounds like the right way to go, but what do you need to get started? How do you build one? What equipment does it take?
Hydroponic growing systems work by transferring liquids through grow media to create nutrient-rich environments, often using simple components like plastic buckets and PVC piping. The most common hydroponic plans fall into 6 main categories:
- The Kratky method
- Wick hydroponics
- Deep water culture (DWC)
- Ebb and flow (Flood and Drain)
- Nutrient film technique (NFT)
- Aeroponics
Multiple variations also exist within these broad categories. Given the number of techniques and ways to modify them, growers in almost any situation should be able to find a set of hydroponic plans that works for them.
To give you some ideas on how you can get started, we’ve compiled a list of 13 hydroponic plans. These plans cover all the major categories and a few different ways to customize some of them. And the best part- you can construct them all yourself, saving you some cash and letting you build skills at the same time.
So let’s get started!
Table of Contents
1. Mason Jar Hydroponics
Did you know that hydroponic growing doesn’t have to be a big, complicated, expensive system? Even if all the space you have is a single bright windowsill or a little bit of countertop room, you can have a hydroponic garden that produces fresh greens, lettuce or herbs all year long.
One way to do this is by converting a plain old Mason jar (or any glass jar) into a hydroponic bed. This project uses the Kratky method, a passive hydroponic growing technique that doesn’t use any electricity.
RELATED: Visit our post on what to grow using the Kratky method to get some ideas of crops to grow and learn more details of how the Kratky method works.
You’ll need:
- A glass jar that holds at least 24 ounces
- Black paint or duct tape (to block light from entering your system)
- Net cups
- Rockwool
- A sheet of thin plastic (a plastic salad greens container works great)
- Sharp scissors or a craft knife
- Nutrient solution
- Filtered water
- Seeds
To read the full instructions and get your own mini garden set up, visit our post on Mason Jar Hydroponics.
2. Large-scale Kratky Tank
If you’ve got a little more space to work with but love the simplicity of the Kratky method, just scale your build up a little bit!
This video from MIGardener explains the process of transforming heavy-duty plastic totes into a Kratky hydroponic tank that can house up to 5 plants. Just like with the small-scale Mason jar technique, larger Kratky tanks are ideal for fast-growing plants that have a compact root structure:
- Lettuce
- Greens (spinach, bok choy, kale, etc)
- Compact herbs (basil, cilantro, parsley, etc)
In a larger Kratky tank like this, some growers have had success growing tomatoes and peppers. However, you’ll need to change the water and monitor your tank more closely, so you will lose some of the wonderful set-it-and-forget-it benefits of Kratky growing.
3. Wick Hydroponics
Another passive hydroponic method is a wick system. This method uses a grow bed suspended over a nutrient solution reservoir, with a strand of cotton or another absorbent material stretched between the two. The cotton string uses capillary action to draw moisture from the reservoir and deliver it into the grow bed, keeping your plants watered and nourished.
Just like the Kratky Mason jar, a wick system is the perfect way to get your feet wet with hydroponics or turn that sunny windowsill into a garden of healthy, fresh foods. No electricity needed!
This video from Green Our Planet shows how to upcycle an empty water bottle into a mini hydroponic system. It’s a super fun idea that doesn’t require much time, experience or expensive supplies. It doesn’t get much easier than this when it comes to DIY hydroponic plans:
4. Deep Water Culture (DWC) Set-Up
This is one of the most popular hydroponic growing methods since it strikes an awesome balance between simplicity and the ability to support larger plants, like peppers and tomatoes.
The basic elements of a DWC system are:
- A reservoir tank
- Air pump
- Airstone
- Nutrient solution
- Net cups
- Growing media
- Seedlings
DWC uses a high water level to submerge the plant roots in nutrient solution, and an air pump/air stone combo produce highly-oxygenated water to further nourish your plants.
Since it needs electricity to power the air pump, DWC is an active system. And it will need some attention on your part to monitor water conditions, nutrient levels and reservoir refills.
Here’s what the system looks like:

RELATED: There are many air pumps and air stones out there to choose from, so how can you know which one you should get? Stop by our posts on the top hydroponic air pumps and air stones for hydroponics to get some guidance!
And they’re not hard to get set up! DWC is perfect for hydroponic growers who are ready to move beyond the Kratky method and onto a more advanced technique.
This video from Tikki O does an outstanding job of explaining how to set up a DWC system from inexpensive components, and she also offers some great insights on how to care for your system.
RELATED: For a more detailed explanation of DWC growing, stop by our post on the basics of Deep Water Culture!
5. Recirculating Deep Water Culture (RDWC)
Recirculating Deep Water Culture (RDWC) uses the same basic principles of standard DWC:
- Submerging plant roots in nutrient solution
- Using an air pump to oxygenate the solution
But when you want to expand your hydroponic system for maximum yield, RDWC is the way to go.
This method uses a single batch of nutrient solution to circulate through two or more reservoirs, and a single air pump supplies the oxygen needed. Here’s an illustration that shows the system:

Another benefit to a RDWC system is that you only have to monitor/adjust nutrient levels and pH for one water sample to run the entire system. This is as opposed to managing nutrients/pH for each individual DWC reservoir you’re running. Also, with a larger volume of water to work with, you’ve got a little more tolerance for error.
Here’s a detailed video showing a RDWC build from PA Hydroponics:
6. Dutch Bucket System
The Dutch Bucket (also called Bato Bucket) hydroponic system uses multiple growing buckets connected by a single irrigation line and a single drain line. At set intervals throughout the day, the water pump sends nutrient solution through the irrigation line to each bucket. Then the excess solution is drained away to be recirculated on the next cycle.
The Dutch bucket system is a fantastic way to grow large plants that demand a lot of nutrients, like tomatoes or pumpkins. And it does all its work with just the bare minimum of water consumption.
This video from MHPGardener does an awesome job explaining what the Dutch bucket system is, why it’s great and how to set one up for yourself:
7. A-Frame Hydroponic Set-Up
Do you have a sunny backyard or a large deck/patio to work with? Then an A-frame outdoor hydroponic garden could be a perfect fit.
Like all A-frame structures, this build type has a wide, stable base, and depending on how you reinforce your build, they can be a sturdy, long-lasting setup for years to come.
Another perk to an A-frame build is that you can grow plants on both side of the frame, and you can also take advantage of vertical space as well. So you’ve got the capability to support a large number of plants with a relatively small footprint.
This video from Useful Videos shows you from start to finish how to gather the necessary supplies, build your frame and get it up and running.
8. A Simple Aquaponics System
Aquaponics takes basic hydroponics and goes one step further: Adding a fish tank underneath a hydroponic growing bed to create a self-sustaining ecosystem that produces a harvest of both vegetables and fish.
Sounds expensive and complicated, right? It doesn’t have to be! Here’s a video from Rob Bob’s Aquaponics and Backyard Farm to show you how to get one set up:
RELATED: We’ve dedicated a post to outlining the differences between aquaponics and hydroponics. Check it out if you want more information!
9. Vertical Hydroponic Tower
Vertical hydroponics is a fantastic option if you’re extra short on space or just want to maximize your harvest with the smallest footprint possible.
You have plenty of pre-made hydroponic garden towers to choose from, but they can be very expensive. Fortunately, you don’t need to shell out a ton of cash to take advantage of this technique if you build one yourself.
This video from Chris Oh shows you how to construct your own closed hydroponic garden tower using:
- PVC piping with some extension and cap pieces
- Appropriate hand or power tools
- A small water pump
- A plastic bucket reservoir
- 2-inch net cups
- Grow medium
Since the plants are packed in pretty densely, it’s ideal for small plants like lettuce, herbs and greens. And it looks great!
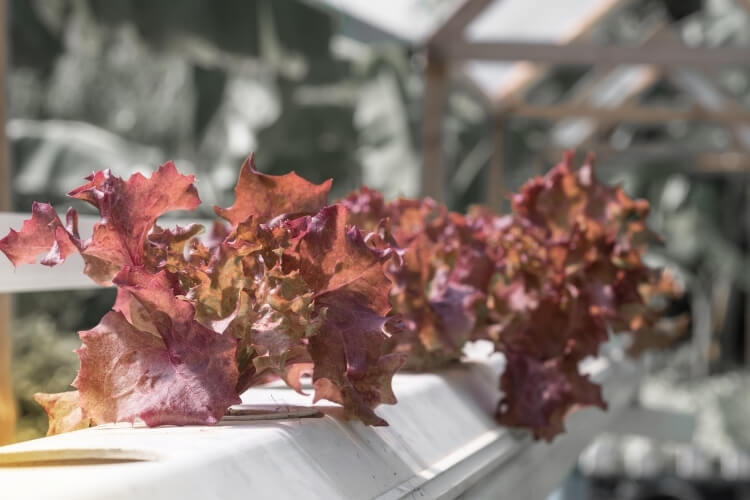
10. Nutrient Film Technique (NFT)
Nutrient film technique (NFT) relies on a balance between nutrients and oxygen. Your plants need each of these elements for healthy, speedy growth, and NFT’s goal is to provide both simultaneously.
It does this by suspending plants in a net cup above a shallow stream (or film) of continuously-flowing nutrient solution. This keeps the root tips in a constant flow of nutrient solution while allowing the majority of the root ball to be exposed to oxygen.
NFT is outstanding for fast-growing crops with compact root systems, like lettuce, leafy greens and bushy herbs. And it only requires a small amount of water and nutrients to run the system since the entire technique is based on a shallow stream of water.
This video from Hoocho lays out the technique for building a home NFT system:
11. Aeroponics Hydroponic System
In aeroponics, your plants are suspended in a mostly-empty reservoir and the roots are intermittently or continuously sprayed with a nutrient solution. The idea is to give plants high exposure to oxygen while still providing nutrients, thereby speeding up growth.
It’s a highly-efficient technique that uses a minimal amount of water and nutrients. In fact, the astronauts on the International Space Station use an aeroponic system to fresh produce in space! If you’d like to see some photos of the space garden, check out NASA’s website.
There are high-pressure and low-pressure aeroponics systems.
High-pressure systems use a powerful air pump to produce a fine nutrient-solution mist. The mist fills the reservoir and nourishes the plants.
Low-pressure systems use a standard water pump to force water through a multi-outlet manifold in the reservoir. This system produces more of a sprinkler-head water flow that runs over the plants’ roots.
Here’s a walk-through of a high-pressure aeroponics build from Aeroponic Growers:
And here is a low-pressure aeroponics build, laid out by Peace Love Garden:
Aeroponics is unique in that you can buy a small pre-built system, an Aerogarden, if you’d like to get your feet wet before building your setup. There are Aerogardens of various sizes along with seed kits and other accessories. Stop by the Aerogarden website to take a look at their full offerings if you’re interested!
RELATED: We’ve gone into much more depth on the differences between aeroponics and hydroponics in a different post. If you’d like to dive into it a little deeper, check out our post.
12. Ebb and Flow (Also Called Flood and Drain)
Ebb and flow is a hydroponic system that uses a grow bed situated on top of a reservoir, and the two are connected via a set of pipes.
One pipe is connected to a water pump which periodically fills the grow bed with nutrient solution. When the pump turns off, the second pipe drains the nutrient solution back into the reservoir to be re-used on the next cycle.
This system gives your plants a great balance of oxygen exposure, nutrients and moisture for fast, healthy growth.
This video from Hoocho shows you how to set up a small-scale ebb and flow (he calls it flood and drain) system that’s perfect for small spaces:
13. Drip Hydroponic System
This one is a twist on standard hydroponic systems. Instead of providing your plants with nutrient solution from a bottom reservoir, drip systems sit above the growing medium and “rain” down nutrient solution from above.
You can use a drip system for any plants you’d like. But if you want to start seeds or clone plants hydroponically, you must have an overhead drip system in place.
Here’s a great video from FenderGibsonWashburn that lays out how to set up a drip system on a single 5-gallon bucket:
If you’d like a larger-scale drip system, Everest Fernandez has an informative (and entertaining!) video that demonstrates the setup:
Frequently Asked Questions about Hydroponic Plans
Final Thoughts
As you can see from this small sampling, there are many hydroponic plans and growing methods that can suit almost anyone.
No matter if all you have room for is a Mason jar or you wind up creating a large-scale hydroponic garden, any food you produce yourself increases your independence and sustainability. And of course, there’s nothing quite like the satisfaction of eating food that you grew yourself!
Which of these hydroponic plans are you most interested in? Do you have any other questions or suggestions to offer?
We’d love to hear your thoughts in the comments!