Crispy leaf edges, limp stems or oddly crumpled leaves- these houseplant woes often point to one thing: Low humidity levels. Fortunately, raising air moisture is one of the simpler plant-care issues to fix, and making a DIY pebble tray for plants is the easiest option of all.
A pebble tray uses a shallow dish, a layer of pebbles and a small amount of water, with the potted plant sitting on top of the pebbles. As the water in the dish evaporates, the leaves absorb the water vapor, allowing the plant to get the humidity it needs while still keeping the soil and roots from sitting in a pool of water. Since it uses the natural evaporation process to boost air moisture, a pebble tray is a passive humidifying method that requires no electricity and minimal upkeep.
In this post, you’ll learn more about why a pebble humidity tray is helpful for your green friends and how to make your own with step-by-step photos. You’ll also find out how to maintain your pebble tray and learn the answers to some common questions.
Let’s get started!
RELATED: Pebble trays are great (I use them myself!), but there are also other effective ways to give your plants the moisture they need. Stop by our post on ways to bump up plant humidity to see other ideas!
Table of Contents
How Does a Pebble Humidity Tray Work?
Many of our favorite houseplants grow naturally in warm, moist tropical regions of the world, where the abundant water in the air and ground promote stunning foliage and flowers.
Plants absorb most of their water through their roots, and they release excess moisture through their leaves in a process called transpiration, which Britannica outlines in more detail. When humidity is ideal, your plant can transpire at its peak pace, which then also boosts root nutrient absorption and photosynthesis.
The humidity in a rainforest can be up to 80%, and your home is probably far less humid than that. If you’re like the average person, your home’s humidity is probably more like 25% to 40%. So you’ll need to add more moisture to the air to keep your plant healthy and happy.
A pebble tray is a simple method that harnesses the natural process of evaporation to raise the humidity around your plant. The tray is filled with a layer of pebbles that your plant’s pot sits atop, and the bottom of the tray contains water. Your plant stays out of direct contact with the water thanks to the pebbles, and the leaves absorb water particles as they evaporate upwards from the water in the tray.
RELATED: Need to humidify the air for multiple plants or for very large ones? A humidifier might be the way to go. Check out our list of top humidifiers for plants here!
Which Plants Benefit from a Humidity Tray?
Any plant that loves humidity can benefit from a pebble tray. There are many plants that fall in this group, bet here’s a sampling to give you an idea:
- Orchids
- Ferns
- Philodendron (including Philodendron Birkin and Philodendron Gloriosum)
- Hoya
- Small palms
- Scindapsus pictus
- Peace lily
- Arrowhead plant
- Polka dot plant
- Purple waffle plant
- Nerve plant
- Chinese money plant
- Peperomia
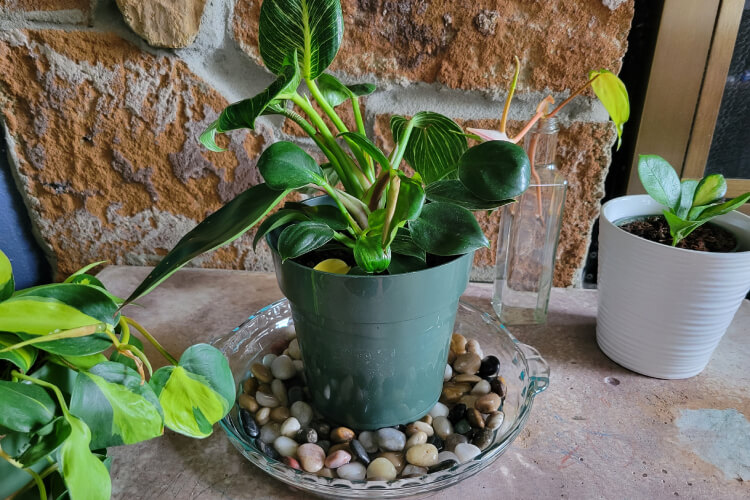
I have a Philodendron Birkin to place on the pebble tray I’m making. This plant is showing a couple of indicators that it needs more humidity.

See the partially-unfurled leaf in this photo? It’s been this way for at least a couple of weeks. When a leaf gets “stuck” like this, it’s a sign of low humidity. And you can also see a yellowing leaf near the base, which is another common sign that air moisture is too low.
Other clues that your plant needs more humidity include:
- Leaves curling downward, especially at the tips
- Brown, crispy leaf edges
- Slow growth
- Shriveled leaves
- Plant drooping or wilting
Plants That Do Not Need a Humidity Tray
Plants that naturally grow in dry or desert climates have adapted to low-humidity conditions, and placing them on a pebble tray can lead to mildew or mushy, unhealthy leaves.
That’s not the look you’re going for, so keep these plants away from extra humidity:
- Cactus
- Aloe vera
- Succulents
For large houseplants, like Monstera deliciosa or majesty palm, getting a pebble tray under your plant is a lot of heavy, inconvenient work. And a pebble tray won’t work for plants in hanging baskets unless the plant is small and you have it on a suspended tray. In these cases, you’re better off running a humidifier or misting your plants every few days.
Materials Needed to Make a Pebble Tray for Plants
You only need a few simple materials to build your pebble tray:
- A tray that’s equal to or larger than your plant’s foliage span
- Small to medium pebbles or rocks
- Clean filtered water
Let’s break these materials down in a but more detail:
Tray or Dish
Water molecules evaporate upwards, so you want as much leaf to be able to absorb the humidity as it travels past. I found a 9-inch glass pie dish in a dark corner of my kitchen cabinet, and it’s ideal for my pebble tray purposes.

Any container that’s the large enough in diameter and at least 1 inch deep will work. These are a couple of suggestions:
- Large drip saucers
- Wide, shallow bowl
- A baking pan
- A pretty dinner plate
Pebbles or Small Stones
The best rocks for a humidity tray are about 1/4 to 1 inch in size. Small aquarium stones or glass gemstones are perfect if you’d like a little more color.
If you’d like, you can also collect small stones at the beach or from the garden.
Water
I always recommend filtered water for anything to do with houseplants since minerals and chemicals in tap water can cause leaf spotting or stunted growth. If you have to use tap water, let it set out on the counter overnight to allow the chlorine to evaporate.
How to Make a DIY Pebble Tray Step-By-Step
I thought this process was fun, and it was certainly easy! Here’s how to construct your own pebble tray:
1. Wash Your Pebbles
Whether you purchased a brand-new bag of pebbles or collected them yourself outside, take the time to wash your pebbles well with soapy water. You don’t want to take the chance of introducing industrial chemicals or pests to your plant.
Rinse the pebbles well after washing. Since they’re going to get wet anyway, you don’t have to dry them off before moving on to the next step.
2. Add Pebbles to the Tray

Make a pebble layer about 1 inch deep, with 2 inches the maximum I would recommend. The more pebbles you have, the greater the chance for your plant to shift or tip, and there’s also a greater risk of excess water stagnating.
If you’re using a glass tray like I am, be gentle here! Even small rocks can chip or crack your tray, so add them slowly and carefully.
3. Add Water

Fill your pebble tray to just below the tops of the pebbles. You want your plant to absorb water vapor, not sit in a pool of water- this can over-saturate your soil and lead to root rot.

See how the water line is just a bit below the tops of the pebbles? That keeps your plant out of the actual water while still allowing plenty of water surface area for evaporation.
4. Settle Your Plant on the Pebble Surface

Set your plant on top of the pebbles, shifting pebbles around as needed to get a flat, stable surface. Move your plant back to its normal spot, and enjoy!
Maintaining Your Pebble Tray
Any time there’s standing water, there’s the chance it can stagnate, leading to a few potential problems:
- Odors
- Algae growth
- Pests
The good news is these issues are pretty easy to avoid as long as you keep your pebble tray properly maintained. Here’s what to do:
- If the water completely dries up, your pebble tray can’t its job of producing humidity. Check on the water level every few days, and add more when the level falls below the top of the rock line.
- About every 7 days, do a complete water change. Dump out all the old water, give your pebbles a light rinse and refill with fresh water.
- If your tray is in direct sunlight, be vigilant for algae growth. If you see any, take your tray to the sink and wash your pebbles and tray with soapy water. Rinse, and refill with fresh water.

Frequently Asked Questions about Pebble Trays for Plants
Final Thoughts
It might be scary to spot low-humidity problems on your plants. But with a simple solution like a pebble tray, your plants should perk back up in no time.
I hope you’ve seen just how easy it is to construct a pebble tray for your plants. It only takes a few minutes, and you may have all the materials in your house already!
Do you have any other questions about making a pebble tray for plants? Or maybe you’ve dealt with a few plants suffering from low humidity and have some tips to share. We learn best from one another, so please feel free to post your questions/thoughts in the comments!