I can’t be the only one noticing that grocery prices are on a steady upward trend. Fortunately, there are quite a few fruits and veggies that you can regrow from the parts you would normally throw away. This can help stretch those grocery dollars further and also let you feed your family nutritious, fresh food.
Cabbage produces a dense head of tightly-compacted leaves that grow upward out of a central stem. After cutting away the top portion of the cabbage head for immediate eating, you’re left with a stem that still has the ability to produce fresh leaves. After rooting your cabbage scrap, you can grow it in water indoors or in soil outdoors.
In this article, you’ll learn how to grow cabbage from scraps step-by-step. I took plenty of photos of the whole process, so you can follow along easily.
Let’s jump in!
RELATED: Cabbage isn’t the only veggie you can regrow from leftover scraps! Stop by our posts on growing broccoli from a stem and getting seeds from bell peppers for regrowing.
Table of Contents
Expected Harvest From Regrown Cabbage Scraps
Right off the bat, let’s outline what you can expect from a regrown cabbage scrap.
When you grow cabbage from scraps, you will not get a whole new head.
When grown from seed, a cabbage plant produces just one main head per year along with several separate leaves.
Since you’re regrowing from the cabbage head itself, expect to harvest small, individual leaves. As long as you maintain your regrown scrap well, it should continue to produce new leaves for quite a while.
So even though you won’t get a whole new head, it’s definitely worthwhile to regrow from scraps.
Types of Cabbage Can You Regrow from Scraps
According to the University of Illinois Extension, there are several varieties of cabbage available, with these being the most common:
- Green cabbage
- Red cabbage
- Savoy cabbage
- Napa cabbage
The good news is that if you have any of these on hand, you can regrow them from scraps as long as you have the bottom stem portion intact.
Supplies for Regrowing Cabbage from Scraps
It takes just a few supplies to regrow cabbage from scraps, all of which you probably already have on hand:
- Cut cabbage stem
- Water
- Shallow and narrow dish, just large enough so that the bottom of the scrap touches the water
- Sunny spot
- Pot and soil (if transplanting outdoors)
- Patience
How to Cut a Good Cabbage Stem for Regrowing
Choose a cabbage head that is firm and has a good color. The stronger the cabbage head you start with, the better your chances of success at regrowing.
Also, choose a cabbage head that has a stem piece that’s at least 1/2 inch long. This is where the roots will grow. Leave about 1/2 inch to 1 inch of the leaves above the stem intact when you cut the cabbage head.
(The photos below will help illustrate these points a lot better.)
First of all, let me show you what to avoid when regrowing cabbage. Here’s a scrap cutting I took from a red cabbage. This one never grew any roots at all, despite being in the same conditions as my successfully regrown scrap:


I was unsuccessful at regrowing this cabbage scrap owing mainly to a couple of factors:
- Not enough stem left on the cabbage head. The head was nearly flat where it had been harvested from the plant.
- Too small of a cutting. I misjudged where I cut the stem and ended up with one that was just too small to support new life.
Now, let me show you what a good cabbage head and scrap look like:

See how this cabbage has a much more substantial stem than the red one above? That’s much better for our regrowing purposes.
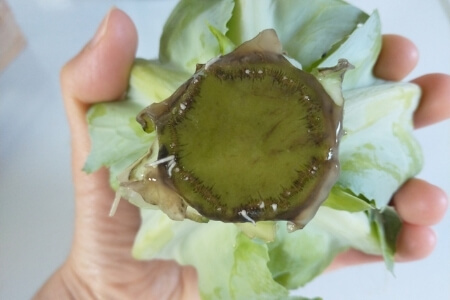
This photo shows what the stem looked like after I took off the head’s outer leaves. It was about 1/2 inch long after removing the leaves:

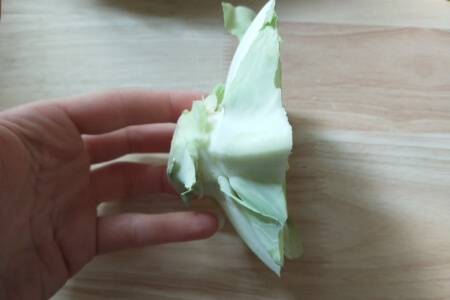
And here is the scrap I cut, being careful to leave more of the original head attached:

Bottom line: Look for a cabbage head with the longest stem possible and leave a fair amount of the cabbage head intact when cutting.
Rooting Your Cabbage Scrap
After getting a good cutting, place your scrap in a shallow dish of water. Make sure the entire bottom surface of the stem is in the water by about 1/4 inch. You don’t want your entire scrap to get wet since that can lead to decay, a bad smell and a poor regrowing outcome.
Here’s my scrap in water:

The dish I chose is narrow enough for the bottom of the cut head to rest on while the stem is submerged in water. That’s what you want to see.
Now put your cabbage scrap in a sunny window. A south-facing one typically works best, but east-facing is the next best choice.
Keep an eye on your water level every day. Replace the water every couple of days or when it gets cloudy, and maintain a water level that just keeps the stem submerged.
One week after I took my cabbage cutting, this is what I saw:

Baby roots, yay!
Maintaining Your Regrown Cabbage Scrap
At this point, you have a couple of options:
- Leave your rooted scrap in its water dish and sunny spot to keep growing.
- Transplant into soil and move outdoors.
Keeping Your Cabbage Scrap Indoors in Water
This is the simplest option for keeping your regrown cabbage going. Just keep doing what you’ve been during the rooting phase:
- Keep the water clean and high enough to cover the bottom of the stem
- Maintain sunlight exposure
Harvest the leaves as they grow.
However, as much as you try, you can’t ever replace the natural sunlight that plants get outdoors, especially sun-loving vegetable plants. So you may not get as many leaves to harvest and eat when you keep your scrap indoors.
Transplanting Your Scrap in Soil Outdoors
I have more space available outdoors than I do indoors, so I wanted to transplant my scrap into soil and move it outdoors.
To successfully make the jump to soil, the baby roots need to be a little longer, about 1 inch long. So I returned the scrap to its water dish, and just three days later, here’s how much the roots had grown:


Pretty impressive, right? So this scrap is definitely ready to move into a pot and a new outdoor home.
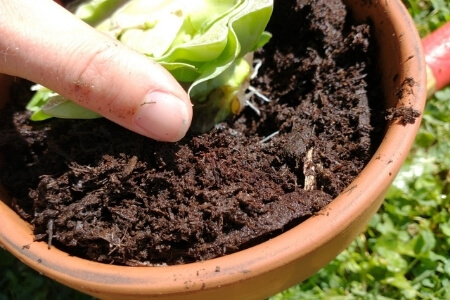
I filled a small terra cotta pot with standard potting soil, moistening it slightly. Use a light touch with these new roots since they are still very young and delicate.
Make a small hole and settle your scrap into the soil gently:

Add more soil around the sides to fill in, lightly firm the soil around it and water it in well. Here’s my scrap after planting:

Cabbage likes to grow in full sun, so choose a spot that gets at least 6 hours of sunlight daily. But since we’re taking our scrap from a sheltered indoor location to a new, brighter environment, it’s best to make the move in stages over a few days.
The best place to start your newly-potted scrap is a south-facing location that still gets shade, like a covered porch.
If you don’t have that, you could use shade cloth to create a mini shelter that lets rain and filtered sunlight through. This shade cloth from Gardeningwill is a good option.
I have a UV plastic-covered raised bed that gets partial sun on one side and more sun on the other side. So I put my scrap on the shadier side to start out with. Taller plant friends help provide some shade cover, too:

Here’s what my scrap looked like one week after transplanting into soil:

See how little leaves are growing around the central stem? We’re on the right track!
And here’s my scrap after another week:

So there was a lot of progress this week! Here’s a closer view of a couple of those new leaves:

I took this photo 3.5 weeks after I cut the cabbage scrap and put it in water. At this rate, I could start harvesting some young leaves in just a few more days.
Problems to Watch Out for While Growing Cabbage From Scraps
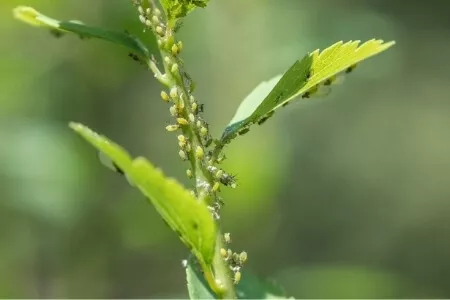
One to watch out for when you regrow cabbage from scraps is aphids. These tiny bugs suck sap from plant leaves, and they may attack to the point of killing your regrown cabbage.
Keep an eye out for tiny gray or green spots on your cabbage scrap. Here’s what to look for:

You can spray your plant with water to wash away some of the aphids, but it won’t be enough to fully get rid of them. This is because aphids have a wax-like outer layer that protects them from water.
Instead, spray your cabbage scrap with insecticidal soap. This disrupts the protective barrier and kills the aphids. This formula from Natria works well.
I didn’t have any aphids on my outdoor scrap, but I did have a small problem with pillbugs eating the outer leaves and leaving waste behind. Here’s what it looked like:

According to the University of Florida, pillbugs are almost always helpful garden residents. They eat dead plant matter, speeding along the decomposition process.
The good news is that they’re leaving the new cabbage growth alone and limiting their eating to the older parts of the scrap that won’t grow back.
So even though it looks a bit off-putting, I’m not worrying about these guys. I’ll just be sure to wash any harvested leaves off extra carefully!
Why Cabbage Deserves a Spot in Your Garden
Cabbage is a great vegetable to have on hand because of its numerous uses as well as health benefits. Some great meals and side dishes using cabbage include the following:
- Cabbage rolls
- Cabbage soup
- Classic slaw
- And many more!
Not just that, but cabbage is really good for you too! According to Healthline, it’s not only low in calories but offers the following nutrients:
- Vitamin K: Necessary for healthy blood clotting
- Vitamin C: Strengthens the immune system
- Folate: Important for energy, metabolism, and nervous system function
- Vitamin B6: Also important for metabolism and the nervous system
- Potassium: Necessary for muscle function
- Magnesium: Electrolyte essential to heart function
Frequently Asked Questions about Growing Cabbage From Scraps
Final Thoughts
Yes, you can regrow cabbage from scraps! I hope you’ve seen that it’s super easy and just takes a little time to see results. With all of the tasty recipes and health benefits, cabbage totally deserves a spot in your windowsill or garden.
We want to hear from you! Are there any questions you still have about regrowing cabbage? Have you tried it before, and do you have any helpful tips to share?
Let us know in the comments!

