We all know and love our pothos: They’re low maintenance, thrive on neglect, detoxify the air, and bring vibrant colors to our homes. And every once in a while, we need to consider repotting pothos to give it the room it needs to grow.
Repotting a pothos is an essential care step that gives you a chance to visually inspect the root system and ensure that it stays healthy and strong. Moving up to a larger pot also gives your plant more room for continued growth and fresh soil provides replenished nutrients. Your pothos may look a little worse for wear immediately after being repotted, but it should bounce back quickly and reward you with even more vigorous growth.
In this article, you’ll learn the steps of repotting pothos with plenty of pictures for visual reference. We’ll also cover what to watch out for after repotting and answer some common questions.
So let’s jump into the topic of repotting a pothos!
RELATED: I’ll be working with my pretty golden pothos today, but that’s not the only lovely pothos variety. Stop by our post on the Snow Queen plant to see more!
Table of Contents
When to Repot Pothos
Pothos is a fast grower, and you’ll likely need to repot it every 12 to 18 months for healthy root development.
The spring and summer months are a great time of year to repot since these are active growing seasons. This means that your pothos is putting extra energy into producing new vines, leaves and roots.
During the fall and winter, pothos goes into a period of dormancy, or a resting phase, where it conserves energy and slows growth. Repotting can be stressful on your plant at any time, but while it’s dormant, your plant has fewer resources available to deal with the stress. So time your repotting to coincide with the active growth season for the best results and the happiest plant.
Here are some signs your pothos needs repotting:
- Roots are growing out of the bottom drainage hole(s)
- Stems are black or dark brown and mushy
- Black or brown spots on leaves
- Soil is compacted
- Leaves and stems are wilting
Here’s my pothos that I’ll be repotting today. I bought this plant about 3 months ago, and it’s made up of three rooted cuttings. That means that there are actually three individual plants growing together in this pot:

It looks healthy from the top, and two of the stems are unfurling new leaves right now. Also, the stems are still green and healthy:

But look at the bottom:

See the root tip extending from the drainage hole? My plant is definitely outgrowing its starter pot.
So let’s give this little guy some more space!
Preparing for Repotting Pothos
Fortunately, repotting a pothos doesn’t involve a whole lot of advance prep work or supplies. Here’s what you need to do:
Choose a Pothos Pot Size
For healthy root growth, choose a new pot that’s 2 to 4 inches larger than your current one. This will give your plant plenty of room to grow!
Plant pots are measured by their diameter at the lip. This little starter pot I’m moving my plant out of is 3.5 inches. I couldn’t get a clear photo while the plant was still in it, so I had to take one afterward!

And my new pot is 6 inches:

So it’s a nice jump up in size. But pothos is a fast grower, so don’t be afraid to use an even larger pot, especially if there’s a pretty one you have your eye on!
Use the Right Pothos Soil
Pothos isn’t very picky when it comes to soil or nutrients. But one thing it does require is good drainage with a light texture.
Never repot your pothos (or any potted plant, for that matter) with dirt from outside or bagged topsoil or garden soil. All these materials are far too heavy and are prone to compaction and water retention, which will outright kill your pothos.
Instead, use a product labeled “potting soil” or “potting mix.” These products are formulated for good to excellent drainage and airflow, and some are specifically blended for houseplants.
We’re not growing an edible plant here, but I still prefer to use organic soil to avoid the chance of adding any chemicals to my indoor air. I like the Bumper Crop Potting Soil blend from Master Nursery. I got a small bag at my local garden center.
Miracle-Gro also offers an indoor potting mix that’s incredibly popular.
Sanitized Scissors or Pruners
Part of the repotting process involves looking at your plant’s roots and trimming away any unhealthy or overgrown portions, which we’ll cover in more detail a little later on.
If you’re not planning to prune any vines on your plant and the roots all look healthy and appropriately sized, you won’t need scissors or a pruner. But it’s better to be prepared and not need a tool than the alternative.
These 5-inch fine-tip Fiskars scissors are the ones that I have.
The sharp point lets you trim your plant with great precision, which is critical when you’re working with delicate roots.
Also, be sure to clean your tools before and after use, especially if any of your plants show signs of disease. Here are some common disinfecting solutions:
- Isopropyl alcohol: Rub the blades with a cotton ball soaked with 70-100% isopropyl alcohol. No dilution, soaking or rinsing needed. (This is what I like to do- it’s the fastest and easiest)
- Bleach: Dilute 1 part bleach in 9 parts water, soak tools for at least 30 minutes, rinse and dry.
- Household disinfectants: Including Lysol and Pine-Sol, follow the label directions to dilute properly. However, these chemicals can be corrosive to some gardening tools.
Water the Day Prior
Check your pothos’ soil moisture level the day before you plan to repot, and give it a good soaking if it’s dry.
Too-dry soil will stick to the pot and make your plant difficult to remove. On the other hand, soil that is too wet will fall apart, potentially damaging some of the tender roots.
So “damp” is exactly where you want your soil moisture. This will make it easier to handle and prepares your pothos for repotting.
The Repotting Process
We’ll break this process down into five steps:
- Prepare your work area
- Remove your plant from its current pot
- Inspect the roots and trim if necessary
- Separate root clumps and trim if necessary
- Situate your plant in its new pot
1. Prepare Your Work Area
Repotting can be a messy task, and covering your work surface helps keep things tidy and easy to clean up afterward.
I like to use a brown paper bag for this. I tear it all the way down on one corner and open the bottom seam to make a nice flat surface:

Then make sure you have all your supplies gathered and within easy reach, and you’re ready to go.
At this stage, I like to set my new pot on the paper bag and add a couple of inches of fresh soil. Then I use my plant (still in its small pot) to get an idea of how much soil I’ll need to add underneath the root ball:

Add as much soil as you need to bring the top of the root ball up to about 1/2 inch to 1 inch below the pot lip.
You can also do this after you’ve removed your pothos from its current pot, but I think it’s a little easier and less messy this way.
2. Remove Your Pothos From its Current Pot
This can be pretty intimidating for some because you don’t want to damage your pothos, but a couple steps can make it much easier and less stressful. If you watered your pothos the day before, it should be a bit easier to remove from the old pot.
Important: NEVER pull on the plant to get it out of the pot. You risk breaking off entire stems and seriously damaging your pothos.
Instead, grasp the pot with the plant stems between your fingers for support, then invert the pot:


When your plant is upside down, gently lift the pot off the root ball. Again, do not pull on your plant, even if the pot doesn’t slide off right away. I had to work with this pot a little, squeezing the sides a few times before I got the plant free.
Gently tapping the old pot a few times can also help loosen the soil. If you need to, you can also use a pencil or a chopstick to gently push through the drainage holes.
With some patience and coaxing, your plant will come free sooner or later. And you’ll see something like this:

Now we can take a closer look at what’s going on with these roots!
3. Inspect Roots and Trim If Necessary
Pothos roots in general should be white to tan in color and vary in width and length. As for texture, the roots should feel pretty firm.
If you spot any dark, mushy sections, root rot has begun to set in. Root rot is caused by a fungus that multiplies in dark, moist environments, and it’s often the result of over-watering. In severe cases of root rot, there may be a slimy film and bad odor. If not treated, the fungus will spread, killing the entire root system.
To address root rot, completely cut away the affected root sections with your sanitized scissors. Trim until you reach healthy, firm roots. If the infection has progressed with noticeable film and odor, you may also need to wash away the slime under a stream of running water.
Also, according to the University of Wisconsin Extension, the fungus that causes root rot can remain on the inner walls of a pot, even if you clean it well. So if your pothos has root rot, throw out the old pot and wash your hands well before handling any other plants.
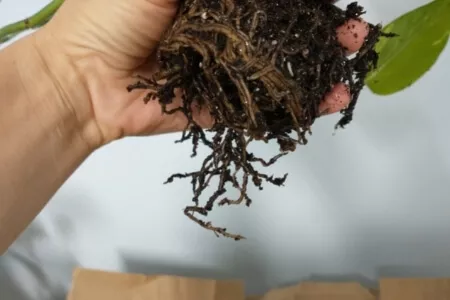
Here’s a closer look at the root ball:

This plant was definitely out of space to grow in its former pot, and the roots were forced to grow in a circular pattern around the pot’s perimeter. Also, the roots are a little more brownish than I’d like to see, especially the older ones at the bottom.
We’ve got a couple of issues, but overall, the roots are in pretty good shape. They have a nice firm texture, there’s no significant discoloration and no bad smell.
So I don’t need to do any trimming for root rot today.
And it’s fairly unlikely that you’ll stumble upon a serious case of root rot during routine repotting. Typically when a plant suffers from this condition, you’ll notice leaf discoloration and wilting first.
4. Separate Clumped Roots and Trim if Necessary
So the roots on my pothos are a clump that needs some help to break free. When the roots are bound up tightly like this, they’ll take longer to spread out in their new, spacious home.
To separate a root clump, use a light touch and go slowly. Working from the bottom up, gently tease the roots free, one at a time. My pothos was pretty severely root bound, and my goal was to safely separate the three plants.
If your pothos isn’t as root bound as mine, the loosening process will likely involve just a couple of minutes to get the root tips free. But this is a good example of how to deal with a root bound plant!
Here’s the first stage of loosening:

This will knock off some of the soil that’s caught in the roots, and that’s a good thing. You want as much fresh soil in your new pot as possible, so brush away whatever loose soil you can, letting it fall right on your paper bag:

While you’re separating the roots and removing soil, try not to break off any of the larger roots since those are the “lifeline” of your pothos. If you snap off some of the tiny, hair-like roots, that’s no problem at all since they tend to regrow quickly.
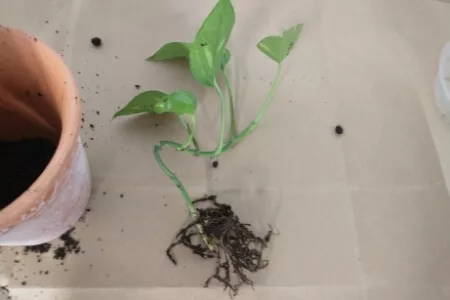
Keep working gently and carefully to disentangle the roots. It took me about 10-15 minutes to get all three plants free. Here are a couple of pictures from the process and the end result:


You’ll notice that a few of those roots are severely overgrown, and you can see where the one on the far left still has a circular shape.
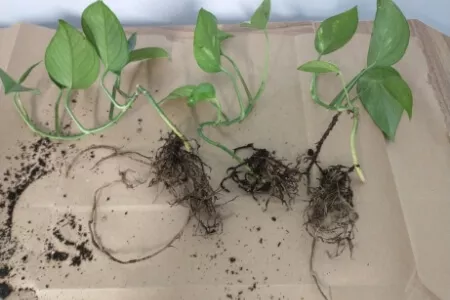
Using your clean scissors, cut away a few inches of the longest roots and any sections of dense roots. Here’s what it looked like when I got all done:

I also want to point out something you may wonder about if you come across it on your pothos. See that section of black root growing out of the plant on the far right in the photo above?
That’s an aerial root, which emerges from the brown bumps on pothos stems. These bumps are known as aerial nodes.
Here’s a better look at the aerial root and an arrow pointing out another aerial node:

In its natural habitat, pothos creeps along the jungle floor or climbs up trees. It sends out new roots from its aerial nodes, either into the ground or the bark of a tree, depending on where it’s growing.
Each of these little brown bumps can send out new roots if it comes into prolonged contact with soil, and that’s what happened here. Pretty cool!
So if you spot one of these roots on your pothos stem too, just treat it like a regular root and cover it with soil.
5. Situate Your Pothos in Its New Pot
Now you’re ready to settle your pothos into its new home. You’ve already got a layer of soil in your new pot, so set your plant right on top of it and scoop fresh soil around the sides:

You don’t want hidden air pockets that will collapse later on, so make sure to fill in any gaps. If you want, you could use a chopstick or a pencil to gently poke around the sides of the pot to help the soil settle into nooks and crannies.
Once your pot is filled, you’re done and you have a newly repotted pothos:

RELATED: As this plant grows, it will naturally fill out the bare space in the pot. But pothos can take on a sparse, leggy look over time, so visit our post on tips for making pothos fuller to get some ideas to beef up your planter!
Now, there are two schools of thought as to whether you should water immediately after repotting your pothos or not. Some say to water lightly while others recommend waiting a couple of days before adding water.
I prefer the waiting strategy. The thought behind withholding water is that the roots will be forced to spread out in search of water. Also, drier soil allows the trimmed roots to callous over before getting exposed to moisture, lessening the risk for infection to set in.
So I’ll give it a couple of days before I water.
Caring for Your Newly Repotted Pothos
Pothos can be a little sensitive to repotting, especially when you have to work with the roots as much as I did.
Give water when the top 2 inches of soil feel dry, just like your normal pothos watering routine.
Also, hold off on any fertilizing, which can be an additional stress to your pothos, for at least one month. After this, add a fertilizer with a balanced liquid formula diluted to the package instructions.
You may see some of these to a small degree due to the nature of transplant shock:
- Leaves turning yellow
- Brown spots on leaves
- Stems turning brown or black
- Leaves curling
- Drooping leaves
These should all resolve in a couple of days. If they persist, try making adjustments to your watering and lighting routine, making sure to avoid over-watering and direct, strong sunlight.
But in all likelihood, your pothos will recover and start growing again before you know it!
RELATED: We’ve dedicated separate posts to the topics of pothos leaf curl and brown spots on foliage. Check them out for more tips and tricks for keeping your plant healthy and happy.
Frequently Asked Questions about Repotting Pothos
Final Thoughts
Repotting a pothos can be a little intimidating if you’ve never done it before, but you’ve got what you need here to do it successfully. With a gentle hand and a little practice, you’ll become a pro at repotting pothos in no time!
Do you have any other questions about repotting pothos? Or maybe some other helpful tips you’d like to share?
Let us know in the comments!

